Adding a second sidebar to your Blog -
Adding a second sidebar to your Blog - part 2
In one of my older posts, I gave a short tutorial on how to add a second sidebar to your Blog. Recently I got some comments of people who got stuck, so I decided to post a second, more detailed tutorial on how to rig up a second sidebar.
Understanding structure and layout.
First of all, you have to understand that your Blog Layout consists of several sections. The standard Blogger template has a Header-section, a Sidebar-section, a Main-section and a Footer-section. Inside these section Blogger puts the widgets, these are the page-elements that you can select from the Template-tab.
Now, let's take a look at the structure of a standard Blog. If you create a fresh, new Blog, the Page Elements Tab looks like this:

This Layout has 4 sections: Header, Main (with the Blog Posts), Sidebar and Footer.
The HTML-template looks like this (the line-numbers are added for reference only):
010: <body>
020: <div id='outer-wrapper'>l<div id='wrap2'>
030: <!-- skip links for text browsers -->
040: <span id='skiplinks' style='display:none;'>
050: <a href='#main'>skip to main </a>
060: <a href='#sidebar'>skip to sidebar</a>
070: </span>
080: <div id='header-wrapper'>
090: <b:section class='header' id='header' maxwidgets='1' showaddelement='no'>
100: <b:widget id='Header1' locked='true' title='Second Sidebar (Header)' type='Header'/>
110: </b:section>
120: </div>
130: <div id='content-wrapper'>
140: <div id='main-wrapper'>
150: <b:section class='main' id='main' showaddelement='no'>
160: <b:widget id='Blog1' locked='true' title='Blog Posts' type='Blog'/>
170: </b:section>
180: </div>
190: <div id='sidebar-wrapper'>
200: <b:section class='sidebar' id='sidebar' preferred='yes'>
210: <b:widget id='BlogArchive1' locked='false' title='Blog Archive' type='BlogArchive'/>
220: <b:widget id='Profile1' locked='false' title='About Me' type='Profile'/>
230: </b:section>
240: </div>
250: <!-- spacer for skins that want sidebar and main to be the same height-->
260: <div class='clear'> </div>
270: </div> <!-- end content-wrapper -->
280: <div id='footer-wrapper'>
290: <b:section class='footer' id='footer'/>
300: </div>
310: </div></div> <!-- end outer-wrapper -->
320: </body>
Lines 010 and 320 are the body-tags. All your code has to be between these two tags.
Lines 020 and 310 are the div-tags for two wrappers, the wrapper called "outer-wrapper" and the wrapper called "wrap2". In CSS you can define fonts, colors, and other styling for these wrappers. We'll look into CSS later in this tutorial.
Lines 080 to 120 contain the header. As you see, there is a div-wrapper (080 and 120), section-tags (090 and 110) and the widget that contains the header itself (100).
Lines 130 to 270 contain the content. Content means here: blog posts and sidebar. There is a div-wrapper called "content-wrapper" (130 and 270), and inside this wrapper there are 2 more wrappers: the "main-wrapper" (140-180) and the "sidebar-wrapper" (190-240).
Inside the main-wrapper we find the main-section (150 and 170) with the Blog-widget (160). This widget contains your posts.
Inside the sidebar-wrapper we find the sidebar-section (200 and 230) with an Archive-widget (210) and a Profile-widget (220).
And finally we have a Footer (280-300).
Now that we understand the structure, let's take a look at the formatting of this template. In the stylesheet you will fund the following code:
#outer-wrapper {
width: 660px;
padding: 10px;
....... }
#main-wrapper {
width: 410px;
float: left;
....... }
#sidebar-wrapper {
width: 220px;
float: right;
........ }
The outer-wrapper has a width of 660 pixels. The padding is set to 10 pixels, so that everything that is inside the outer-wrapper stays 10 pixels from the border. So that leaves 660 - 20 = 640 pixels for main-wrapper and sidebar-wrapper.
The main-wrapper has a width of 410 pixels, and floats to the left.
The sidebar-wrapper had a width of 220 pixels, and floats to the right. Together, main-wrapper and sidebar-wrapper have a width of 410 + 220 = 630 pixels. In the middle there is a space of 640 - 630 = 10 pixels.
So, if we want to squeeze in a second sidebar, we have to do something to create space. As it is now, it won't fit in.
Adding a second sidebar.
First, we will add the sidebar to the structure of the template, then we will add it to the CSS, and make it fit into the page.
Step 1: Backup the template.
Step 2: Make your right-sidebar unique.
Change lines 190 and 200:
190: <div id='right-sidebar-wrapper'>
200: <b:section class='sidebar' id='right-sidebar' preferred='yes'>
In your CSS style-sheet, change "#sidebar-wrapper" to "#right-sidebar-wrapper".
If you save your template now and view your blog, it should look okay.
Step 3: Add a left sidebar by adding new lines of code:
131: <div id='left-sidebar-wrapper'>
132: <b:section class='sidebar' id='left-sidebar' preferred='yes'/>
133: </div>
Now save your template, and take a look at the Page Elements tab.

You can see there is a new section, just below the header and above the posts. But it is not at the left side of the screen jet. Therefore, we have to add some CSS.
Step 4: Add CSS for the left sidebar.
In your CSS-style sheet, add the following code:
#left-sidebar-wrapper {
width: 220px;
float: left;
word-wrap: break-word;
overflow: hidden;
}
Your Page Layout tab will show something like this:

The sidebar-section is now to the left, but your right-sidebar is suddenly below your posts. That is because the width of 2 sidebars and a main-section counts up to 840 pixels, and that is more than the width of the outer-wrapper (660 pixels).
Step 5. Change outer-wrapper and header-wrapper width.
In your CSS-stylesheet look for the #header-wrapper and #outer-wrapper definitions, and change the width from 660 to 860.
Step 6. Add a page element.
Now finally, add a page element to your left sidebar.
Your Blog Layout will look like this now:

Setup and configuration for New Blogger Tag Cloud / Label Cloud
Code for New Blogger Tag Cloud / Label Cloud
Here is the code and setup information to use the Label Cloud in New Blogger.
First you obviously have to have a blog on New Blogger, and you MUST be using the layouts templates,
(this isn't available for classic templates, or FTP published blogs ) and you must have some posts labeled already. (There needs to be at least ONE label with more than ONE entry or the scripts hit a bug - so have at least one label with more than one entry before starting).
Make sure you backup your template before making any changes!
Log into Blogger and go to your layouts section. On the 'Page Elements' setup page
make sure you have a label widget already installed where you want it (it can be moved around
later). Then go to the Edit HTML settings and leave the widgets NOT exapanded. It will make
things easier to deal with.
Now the code comes in 3 parts. A section for the stylesheet, a configurations section,
and then the actual widget itself.
The first part to put in is the stylesheet section. The following code needs to be copied
and inserted into your stylesheet, which in the layouts is marked out by the
Easiest thing to do is find the closing skin tag
]]>
and place the code right BEFORE that.
Here it is, copy and paste without modification right now. I'll explain what can be tweaked
later.
This next section is the configuration section for the Cloud. It also goes in the head
of the template, but outside of the stylesheet part. Easiest thing to do again is to find
the closing stylesheet tag
]]>
But this time place the code right AFTER that line, but BEFORE the tag. Here it is.
All of these settings can be changed but I'll explain them in a moment. The defaults will work for now.
Now the widget itself. Scroll down and find the label widget in your sidebar. It should look
something like this.
Copy the following code (from beginning widget tag to ending widget tag) and replace
the line above with it.
Now if all has gone well, and you have posts already labeled, then if you preview the
blog you should see some form of the Cloud appearing. If it doesn't appear, then something
went wrong. You should probably back out and try it again from the start.
Update : I've found 2 things to check for first if the label cloud isn't showing. First make sure that at least one of your labels has more than one entry. A bug in the script causes it to fail when all the labels have only one entry.(As soon as any label has more than one entry, then it should be ok from then on) Also, make sure that none of your labels contain quote marks " . Apostrophes or single ticks ' are ok. ------
Most likely the cloud with it's default settings won't be what you ultimately want. But all
the colors and sizes are configurable to match your tastes. If the cloud is appearing in preview
then you can go about changing some of the variables so they suit.
The settings in the Variables section will be where you make most of your adjustments. Here I'll
explain what each setting does.
var cloudMin= 1;
This setting you can use to limit the number of labels shown (for example if you have a lot of labels). Leave the setting at 1 to show ALL labels. If you enter in a higher number, then only labels that have at least that number of entries will appear in the cloud.
var maxFontSize = 20;
var maxColor = [0,0,255];
var minFontSize = 10;
var minColor = [0,0,0];
var lcShowCount = false;
The lines for
maxFontSize
maxColor
do what you may think they do. The first one sets the size (in pixels) of the label with the
most amount entries. The maxColor sets the color of that entry (in RGB format). Similiar with
the next two
minFontSize
minColor
Just these are for the label with the least amount of entries. Again the size is in pixels,
the color is in RGB format. Any labels between the two will get their color/sizes based on
how many labels they are, and where their entry count falls, giving the much desired cloud
effect.
From my experimenting, there are many factors that make up a pleasant looking cloud. From
color/size choice, to the number of actual labels, to how well dispersed the entries are amoung
the labels. 3 Labels don't make a good cloud as there isn't much to work with. You just have
to experiment around to see what looks good with your setup.
IMPORTANT, when change the color settings, Keep them in the format supplied. In between the [] and
the numbers separated by commas. The default colors are BLUE for the max and BLACK for the min.
You can select any valid RGB color combination. If you don't know what RGB colors are, don't
worry. It's just a way of defining a color. You can use many charts on the Internet to
get the correct RGB value for the color you want to try. Here's one that is fairly good.
RGB Color Code Chart
Remember, if you get the 3 sets of numbers to enter them in correctly. Inside the [ ] separated by
commas.
Also experiment with different font sizes. Again it depends on how many entries, how dispersed
they are, and how much room for the cloud is available as to what looks good.
The last variable there is
lcShowCount
This can either be false (default) or true. All this does is turn off/on the post count displayed
next to the label. Usually in a 'traditional' cloud the count isn't used. But if you go to a
'flat' listing then it's sometimes useful to turn it on.
Now to the CSS section. Most people won't need to tweak these much, and it's not necessary to
understand what all those entries are for. Most are just to make sure that other styling
elements from the rest of your page don't inherit in and ruin the cloud. But there are a few
that you may want to change to suit.
The first line
#labelCloud {text-align:center;font-family:arial,sans-serif;}
You could change the fonts used in the cloud here if you wanted.
Also, the text-align statement can also be changed. I have it set to center by default but you
could use
text-align:justify;
text-align:right;
text-align:left;
If those suit better.
The next line
#labelCloud .label-cloud li{display:inline;background-image:none !important;padding:0 5px;margin:0;vertical-align:baseline !important;border:0 !important;}
Well don't worry about most of it unless you are a hardcore CSS'er. The only one of real
importance is the first entry
display:inline;
You can change that to
display:block;
To get the 'Flat' (each entry on it's own separate line) listing of the weighted entries.
Usually if that is set to block you would probably want to change the sort frequency from
alphabetical to frequency. You do that by editing the widget from the Page Elements tab in
Blogger.
And the last bit I'll mention is the line
#labelCloud .label-count
If you set the lcShowCount variable to true to show the post counts, you could change the
color/size of those numbered entries with that line.
Widget Below of the Header
Few days ago, there are some friends who ask me, “ How to save widget below header exactly? ” Generally, we can’t save widget or element, right in below of header in Blogger template. Usually, we can only put element or widget in top of Post element, but of course width of that element just as wide as ‘post width’. Then maybe you will ask me, “ Do we have some ways, to save widget or element, exactly below the header? ” The answer is…. Of course, we can…. In fact, we have a lot of ways for fix that thing. But, in order that there are limitations of times and places, I can’t write all of the tricks here. I will only give you one way for fix that problem. Ready? Okay then, here we go….
Follow my instructions below:
1 Login to Blogger with your id.
Click Layout.
2 Click Page Element tab, look at the structure of your layout template. Usually, the header element will be show like this :

We are going to fix this thing. Let’s begin the party!!!
Just click Edit HTML tab.
Click sentence Download Full Template, you must backup this thing. It’s very important!
Find out codes which like this :
Delete that code and change with this one:
Click Save Template button. Wait ‘till this is done.
Click Page Element tab and your layout template will be like this :

Feel please to customize your blog with a new Page Element below the header.
In order to add Page Element, you can click Add Page Element. You can add anything you want. And then, you can drag the new element, below of header elementr, if you already finish your business with your new element.
If your setting was done, just click SAVE in top of that page.
Well done, now see the result.
Happy blogging to all.
Blog Tool & Resource - Blog Editor / Widgets / Templates / Themes / Poll / Blog Direc
Blog Tool & Resource - Blog Editor / Widgets / Templates / Themes / Poll / Blog Directories / Ping Services
Desktop / Stand Alone Blog Editor
Well I usually use the online default editor. But for all of you out there desperately seeking much more our of your blog editor, there are plenty of options available
ScribeFire (previously Performancing for Firefox) (Firefox Add-on/Free)
http://www.scribefire.com/
w.bloggar (Windows/Free)
http://wbloggar.com/
ecto (MacOSX ,Windows /Shareware)
ecto is a feature-rich desktop blogging client for MacOSX and Windows, supporting a wide range of weblog systems, such as
Blogger, Blojsom, Drupal, MovableType, Nucleus, SquareSpace, TypePad,
WordPress
http://infinite-sushi.com/software/ecto/
Qumana
(Mac,Windows/Free)
Qumana is a simple desktop
editor for Windows and Mac OS that helps you write to multiple blogs all from one convenient interface.
http://lycos.qumana.com/
Zoundry Blogwriter (Windows/ Free)
http://www.zoundry.com/download.html
Thingamablog (Windows,Mac, Linux/Free)
Thingamablog is a cross-platform, standalone blogging application that makes authoring and publishing your weblogs almost effortless. Unlike most blogging solutions, Thingamablog does not require a third-party blogging host, a cgi/php enabled web host, or a MySQL database. In fact, all you need to setup, and manage, a blog with Thingamablog is FTP, SFTP, or network access to a web server.
http://thingamablog.sourceforge.net/
BlogDesk (Windows/Free)
BlogDesk is optimized for the blog systems WordPress, MovableType, Drupal, Serendipity and ExpressionEngine as well as the bloghosters Blogg.de and Twoday.net.
http://www.blogdesk.org/en/download.htm
Post2Blog (Windows/Free)
Post2Blog 3 is a freeware handy blog editor with live spell-checking support for pro-bloggers
http://www.bytescout.com/post2blog.html
BlogJet (Windows/Shareware)
BlogJet is a shareware windows blog client for managing multiple blogs.
http://www.codingrobots.com/blogjet/
BloGTK Blog Editor (Linux/Free)
Nice blog editor for Linux.
http://sourceforge.net/project/showf...group_id=87493
QTM (Linux/Free)
QTM is another Linux based blogging client which is presently capable of composing, formatting and submitting blog entries to a weblog.
http://qtm.blogistan.co.uk/
Bleezer (Windows, Mac OS X, Linux /Free)
Bleezer is a freeware. Works on Windows, OS X, and Linux.
http://www.larryborsato.com/bleezer/
blogBuddy (windows/Free)
blogBuddy is a small Windows 95/NT/ME/2000/XP program written in Delphi that manages Blogger.com and other weblogs which implement the Blogger API.
http://blogbuddy.sourceforge.net/
Drivel (Linux/Free)
http://www.dropline.net/drivel/
iJournal (Mac/Free)
http://ijournal.os10.org/wiki/index.php/IJournal
Blogger for Word (MS – Word Blogger Addin /Free)
http://buzz.blogger.com/bloggerforword.html
Blog Widgets
Widgets are a nice way to dress up your blog and providing extra features at the same time. Be it FEEDJIT or aStore or any other widget they always spice up the blog. Here is a list of links where you can find out more about widgets and also many nice widgets for your blog.
http://technorati.com/widgets/blogwidgets
http://mashable.com/2007/09/06/widgets-2/
http://weblogtoolscollection.com/
http://wordpress.org/development/200...idgets-plugin/
http://www.widgetbox.com/
http://www.blogrush.com/
http://www.majikwidget.com/mw/index.php
http://www.feedblitz.com/f/?AddBloggerWidget
http://www.blogorator.com/
http://www.widgets-blog.com/
http://www.widgipedia.com/widgets/search/tag/blogger
http://googletranslategadget.blogspot.com/
http://widgets.wordpress.com/
http://codex.wordpress.org/Widgets_SubPanel
http://buzz.blogger.com/2007/02/make...r-widgets.html
Resources for Blog Templates
BlogSkins
http://www.blogskins.com/
Free Blogger Templates
http://www.finalsense.com/services/blog_templates/
Layouts Gala
Free CSS Templates
http://blog.html.it/layoutgala/
Free Templates for Blogger, Blogsky, Persian blog, and Movable Type
http://www.ehsany.com/
Templates for Blogger
http://www.geckoandfly.com/blogspot-templates/
http://blogger-templates.blogspot.com/
http://blogspottemplates.blogspot.com/
http://www.pyzam.com/bloggertemplates
http://freetemplates.blogspot.com/
http://www.bloggingthemes.com/
Blogger Templates Directory
http://blogger-templates-directory.blogspot.com/
Wordpress Themes
http://themes.wordpress.net/
http://themes.enquira.com/category/wordpress-themes/
http://topwpthemes.com/
http://www.romow.com/blog/category/f...dpress-themes/
http://www.ventedoy.com/themes/
http://www.bestwpthemes.com/
http://www.templatesfactory.net/blog...ory/wp-themes/
http://www.wordpresstheme.com/
http://www.askgraphics.com/freetemplates/
http://wpgarden.com/
http://templatextreme.com/products/w...hemes/list.php
http://themez.info/
http://cureless.net/works/wp-themes/
Lot of WP Themes
http://weblogtoolscollection.com/arc...dpress-themes/
Polling Widgets / Services
Want to add a poll to your post? It’s simple to do with all these easy to use polling services.
http://www.quimble.com/
http://www.addpoll.com/
http://www.pollpub.com/
http://polls.blogflux.com/
http://blog.jalenack.com/archives/democracy/
http://www.blogpolls.com/
http://www.vizu.com/
http://www.blogpoll.com/poll/
http://dev.wp-plugins.org/wiki/wp-polls (Wordpress Only)
http://www.bloggeries.com/makepoll.php
http://www.htmlpoll.com/
http://www.blogpolling.com/
http://pollcode.com/
Blog Directories
One of the ways to bring more traffic to your blog (although not most effective and fast) is to submit your blog to blog directories. Most of them don’t charge you for listing. Below is a list of Blog Directories
http://www.bloggeries.com/
http://www.blogarama.com/
http://www.weblogalot.com/
http://www.blogdirs.com/
http://www.blogrankings.com/
http://www.blog-directory.org/
http://www.blogit.com/Blogs/
http://www.bestblogs.org/
http://blo.gs/
http://www.bloggapedia.com/
http://blogs.botw.org/
http://blogannounce.info/
http://www.topblogarea.com/
http://www.bloghints.com/
http://www.blogcatalog.com/
http://www.bloghub.com/
http://www.blogtoplist.com/
http://www.totalblogdirectory.com/
Blog Ping Services
Pinging means or notifying a number of services that keep track of blogs that your blog has been updated and hence, they crawl and index your site. This is a very important way to increase traffic to your blog though often neglected.
Below is the list of a few ping services which automatically pings several ping servers at the click of a button.
http://pingomatic.com/
http://pingoat.com/
http://pings.ws/
http://autopinger.com/
http://freeblogping.com/
http://blo.gs/ping.php
http://www.kping.com/
http://technorati.com/ping
Customizing Blogger Meta Tag Title
One that makes our blog crawled easily by Search Engine bot is by installing the Meta tag on our blog template. According to SEO ( Search Engine Optrimization ), a good template is placing the code of post title before the code of blog title; how about blogger template? By default, blogger template is placing the code of blog title before the code of post title.
To prove that blogger template places the code of blog title before the code of post title, please click the post title of your blog and see the upper of your browser, and then you will see it as the example below:

You can see that blog title is before post title, and it is no good for the crawl of our blog by the search engine bot. Compare with my blog that has been modified (click one of the title post of this blog)

It’s different, right? You will see that post title is before blog title. Why so? Because Kang Rohman has customized the blogger meta tag title. This way makes our blog easily crawled by search engine robot. Below is the screenshot of searching result my blog in google.com with the keyword Blogspot Tutorial:
If you are interested in customizing blogger Meta tag title, follow the steps below:
Log in to blogger with your ID
Click Layout.
Click Edit HTML.
Find this code (almost at the upper side, so don’t scroll down too far)
<title><data:blog.pageTitle/></title>
Remove the code and change with this code:
<b:if cond='data:blog.pageType == "item"'>
<title><data:blog.pageName/> | <data:blog.title/></title>
<b:else/><title><data:blog.pageTitle/></title>
</b:if>
Click Save Template
Done
If you have followed the steps, I hope your blog will be easily crawled by search engine bots.
To be noted, what you have done as above, will need several days when search engine accepts the change and customization of your blogger Meta tag title.
How to Create Read More in post
If you are a beginner, possible you'd feel to surprise when seeing the articles in my blog presenting only shares first paragrap or second paragrap, and to read for full article, you must click Read more... link. Alright.. please don't feel surprise, i will discuss about this now.
The function like that called Post Summary. You can make a post summary function with add a little code to your template code. But this code is for new blogger template (beta) and does not work at classic template.
Please follow the steps below :
Step #1 :
Login to blogger with your ID
In the dashboard page , click Layout.
Then click edit HTML tab.
Click the Download full template link. Save your template (very important)
Please mark the little box beside Expand Widget Templates. Wait for a moment.

Go to your template code, and find the code like this :
<p><data:post.body/></p>
Delete the above code and change with this code :
<b:if cond='data:blog.pageType == "item"'>
<style>.fullpost{display:inline;}</style>
<p><data:post.body/></p>
<b:else/>
<style>.fullpost{display:none;}</style>
<p><data:post.body/>
<a expr:href='data:post.url'><strong>Read more...</strong></a></p>
</b:if>
8 Click Save Template button
9 Step #1 is done.
Step #2 :
Click Setting tab.
Click formatting tab.
Go to lower side. you will find a blank text are beside Post Template. Fill that blank text area with this code :
<span class="fullpost">
</span>
4 Click Save settings button.
5 Step #2 is done
How to post your article?
When you post your article, choose tab. and you will see the code below :
<span class="fullpost">
</span>
Place the first paragraps above of :
<span class="fullpost">
and place the rest of paragrap under of :
<span class="fullpost">
and above of :
</span>
and then publish your post. Done.
If you still feel confuse, this is the example how to place your article:
Lorem ipsum dolor sit amet, consectetuer adipiscing elit. Quisque sed felis. Aliquam sit amet felis. Mauris semper, velit semper laoreet dictum, quam diam dictum urna, nec placerat elit nisl in quam. Etiam augue pede, molestie eget, rhoncus at, convallis ut, eros. Aliquam pharetra. Nulla in tellus eget odio sagittis blandit. Maecenas at nisl. Nullam lorem mi, eleifend a, fringilla vel, semper at, ligula. Mauris eu wisi. Ut ante dui, aliquet nec, congue non, accumsan sit amet. (this will show in front of your blog)
<span class="fullpost">
Nulla in tellus eget odio sagittis blandit. Maecenas at nisl. Nullam lorem mi, eleifend a, fringilla vel, semper at, ligula. Mauris eu wisi. Ut ante dui, aliquet nec, congue non, accumsan sit amet, lectus. Mauris et mauris. Duis sed massa id mauris pretium venenatis. Suspendisse cursus velit vel ligula. Mauris elit. Donec neque. Phasellus nec sapien quis pede facilisis suscipit. Aenean quis risus sit amet eros volutpat ullamcorper. Ut a mi. Etiam nulla. Mauris interdum. . (this will show if visitor click read more)
</span>
At front page of your blog, will show just like this :
Lorem ipsum dolor sit amet, consectetuer adipiscing elit. Quisque sed felis. Aliquam sit amet felis. Mauris semper, velit semper laoreet dictum, quam diam dictum urna, nec placerat elit nisl in quam. Etiam augue pede, molestie eget, rhoncus at, convallis ut, eros. Aliquam pharetra. Nulla in tellus eget odio sagittis blandit. Maecenas at nisl. Nullam lorem mi, eleifend a, fringilla vel, semper at, ligula. Mauris eu wisi. Ut ante dui, aliquet nec, congue non, accumsan sit amet. Read more...
The last, if you try this hack and you not succes, don't be panic. upload your backup template, and it's will be back to template code before you do edit.
Allright my friend, i think this enought. See you at my next post.
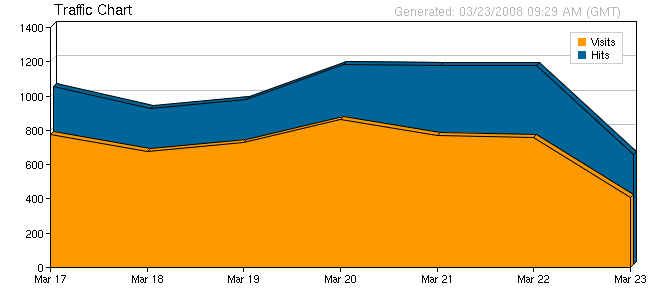
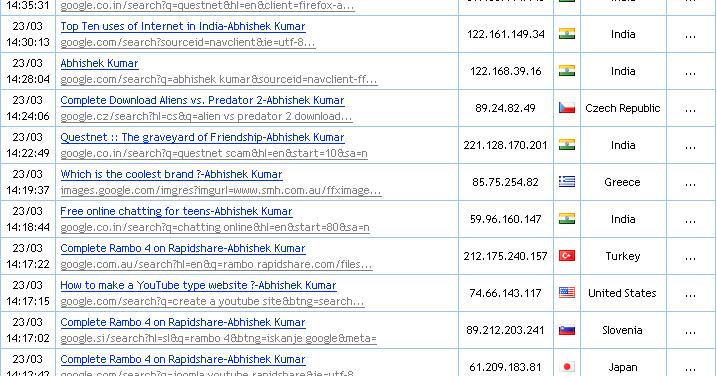
Blog tools to track Visitors for your blog
IceRocket Blog Tracker :: It is a completely free invisible tracker that will count your blog visits and other blog statistics. All you need to do is register for an account, add your blog and insert a small piece of code into your blog so after adding the code, the tracker starts gathering statistics for your blog. Then you will be able to analyse and monitor all the visits to your blog in real-time. It is very efficient tracker so I use it for my blog.

Google Analytics :: It is another famous tool for tracking website visitors by Google. It is very easy to use and has very clean interface. It provides comprehensive details of the traffic, its traffic pie charts and graphs are very effective in analyzing the growth of the website. It is one of the most widely used tracker across the internet.
Salient features of Google Analytics –
Just paste the Google Analytics tracking code into each of your website pages and tracking begins immediately.
It tracks and compares all your ads, email newsletters, affiliate campaigns, referrals, paid links, and keywords on Google and other search engines.
You can buy keywords on Google AdWords and use Google Analytics to learn which keywords are most profitable to your business.
Trace transactions to campaigns and keywords, get loyalty and latency metrics, and identify your revenue sources.
With google analytics, you can find out where your visitors come from and identify your most lucrative geographic markets.
SiteMeter :: Site Meter’s comprehensive real time website tracking and counter tools give you instant access to vital information and data about your sites audience. With the detailed reporting you’ll have a clear picture of who is visiting your site, how they found you, where they came from, what interests them and much more.
Webalizer and Awstats :: My hosting site hostgator is providing two different web stats programs on the log files for this site Webalizer and Awstats. With every cpanel hosting these trackers come free. For tracking the website you don’t need to do anything, they automatically starts tracking when your site becomes online from that server. Webalizer doesn’t distinguish between human visitors and automated requests (bots etc.), whereas AWStats tries to distinguish between the two. So in my opinion, you can rely on Webalizer stats.
StatCounter :: A reliable free invisible web tracker, highly configurable hit counter and real-time detailed web stats. Just you have to register on the site and insert a simple piece of our code on your web page or blog and you will be able to analyse and monitor all the visitors to your website in real-time.
MyBlogLog :: It is the largest blogging directory and community on internet that also provides statistics tracking to registered users of the site. Registration is free. However, the statistics provided by MyBlogLog are not as robust as those provided by other stat trackers like sitemeter, icerocket, statcounter, google analytics etc.
Out of these 7 trackers, I use all of them except google analytics and statcounter. But if you are running a blog and want a good tracker, then I will recommend icerocket’s blogtracker.
New Face of Bog Help
have lot of fuction for your life time anagin we are so good agin some have lite fill of life
How to add meta keyword and description to blogspot
As we known, meta keyword is one important way to optimize your website search ranking. Search engines use meta keyword to filter sites for the search result of querry occured by their search tool. If your keywords is bad, click rate of your site in search result low, your rank will be lower, lower and may be banned out of the list. So, is meta-keyword important?
For blogger users, the question is how to add meta keyword to ours blog? Ya. The answer is:
1. First, sign in to blogger; at Dashboard, click "Layout" tab; then click "Edit HTML".
2. Find this line of code :
You could press Ctrl+F to use "Find" function of your browser.
3. Copy three line below and paste after the line we found at step 2.
'DESCRIPTION' name='description'/>
'KEYWORDS' name='keywords'/>
'AUTHOR' name='author'/>
4. Replace the words in red with your appropriated content.
Now your could view your blog and check your meta tags at the page source ( in your browser, click View/Source(Page Source) ).
Happy harvest exp.
Parameters in Blogspot feed
This post presented with parameters in blogspot feed. As we know, the URL to get feed items of our blog is
http://yourblogname.blogspot.com/feeds/posts/default. You can review this feed after as my blog feed :
http://growyourblog.blogspot.com/feeds/posts/default
Understand these parameters and with a little of javascript can help us create some small 'ourself' interested widget. Lets take a look:
1. start-index.
This param allow the Feed begins at 'start-index' ordinal.
Example :
As normal feed:
http://growyourblog.blogspot.com/feeds/posts/default
result is:
entry 1
entry 2
entry 3
entry 4
entry 5
...
and
http://growyourblog.blogspot.com/feeds/posts/default?start-index=3
result is:
entry 3
entry 4
entry 5
...
2.max-results
This param allow the Feed returns feed-items in range of 'max-results'.
Example:
http://growyourblog.blogspot.com/feeds/posts/default?max-results=10
will shows at max 10 items.
3.published-min, published-max
These parameter allow get feeditems in date range. Example:
http://growyourblog.blogspot.com/feeds/posts/default?published-max=2009-01-01
&max-results=5
4. updated-min, updated-max: same with published-min, published-max.
5.1. Items in the same label:
Link feed:
http://yourblogname.blogspot.com/feeds/posts/
default/-/Label%20Name
5.2. Items in 2 label:
http://yourblogname.blogspot.com/feeds/posts/
default/-/Label%20Name1/Label%Name2
5.3. Items in 3 label: (tương tự cho 4,5...)
http://yourblogname.blogspot.com/feeds/posts/
default/-/Label%20Name1/Label%Name2/Label%20Name3
Optimize site for Google Search
In addition to participating in the AdSense network, you may also be interested in having your site ranked in organic Google search. In this post, I'll highlight some important points for search optimization. While there's no a magic formula to make your site show up first on a search results page, there are some good practices when it comes to links, design, content, and the structure of your site.
First of all, as a reminder, Google organic search and AdSense are independent of each other. Displaying AdSense ads on a site won't change the ranking of the site in Google search in any way. So it follows that sites containing AdSense ads don't receive special treatment in Google search.
Ranking in Google search is based on many different algorithms, and optimization for search is a long, continuous process. For these reasons, and because the techniques might violate our guidelines, we recommend avoiding any techniques that claim to optimize your ranking very quickly or radically. If you have concerns or questions, you can consult other webmasters on a number of forums, including Google's official forum for webmaster-related issues.
We encourage you to monitor the quality of your site's backlinks -- links from any site directing to your site. To increase your site's popularity, check if other sites that discuss similar topics or have a similar reader base are aware your site exists.
Outgoing links are also important and should comply with our guidelines. When you create a link to another site, we recommend first asking yourself: "Is this link going to be useful for my visitors?" or "Is this link likely to be clicked by my visitors?". Don't participate in link schemes or buy/sell links that pass PageRank, as it is against our guidelines and may hurt your site's performance in our search results.
Here are some tips for structuring your site:
- Your pages should have a clear hierarchy and relevant internal links. We also recommend creating a Sitemap and using Google's Webmaster Tools. These tools are useful, user-friendly and will provide information such as where your backlinks come from or which queries visitors used to reach your site.
- Use
- For images, use ALT attributes to describe appropriately what the image is about.
Finally, design your site with your users in mind, and be patient and consistent in your efforts. To attract quality backlinks and develop your optimization strategy, it's important to keep a clear structure for your pages and regularly add organic content.
Ambroise Fensterbank
From Google Adsense Blog
40 best social netwoks to join!
-
http://activerain.com
-
http://bebo.com
-
http://www.blogger.com
-
http://del.icio.us
-
http://digg.com
-
http://www.ebay.com
-
http://www.facebook.com
-
http://flickr.com/
-
http://friendfeed.com
-
http://www.friendster.com
-
http://jaiku.com
-
http://www.jumpcut.com
-
http://www.kiva.org
-
http://www.last.fm
-
http://www.linkedin.com
-
http://lifejournal
-
http://multiply.com
-
http://www.myspace.com
-
http://rss.netflix.com
-
http://openid.com
-
http://www.plaxo.com
-
http://pownce.com
-
http://secondlife.com
-
http://www.shelfari.com
-
http://stumbleupon.com
-
http://www.technorati.com
-
http://textamerica.com
-
http://www.thedjlist.com
-
http://30boxes.com
-
http://www.trulia.com
-
http://tumblr.com
-
http://twitter.com
-
http://typekey.com
-
http://upcoming.yahoo.com
-
http://wakoopa.com
-
http://wink.com
-
http://www.yelp.com
-
http://youtube.com
-
http://www.zillow.com
-
http://www.zorpia.com